Docker
Docker is an open-source platform for developers to build, deploy, and manage containers.
- Website: http://docker.com/ ↗
- Docs: https://docs.docker.com/ ↗
Docker was originally created by Solomon Hykes in 2013 and started as an internal project for dotCloud (a PaaS provider), where it was then showcased in PyCon in 2013 and then quickly made open-source.
While containerisation’s original concepts started in 1979 with Unix V7, Docker has made containerisation a popular technology since its release in 2013. Docker’s popularity is due to making the benefits of containerisation accessible and modern.
- The Docker platform is compatible with Linux, macOS and Windows. Because of how containerisation works, if a device supports the Docker Engine, you can run any container, regardless of the application or dependencies.
- A significant benefit of Docker is its portability. Docker uses “images” to store instructions to dictate how the container should be built.
- These “images” can be exported, shared and uploaded to both public and private repositories such as DockerHub and GitHub. The “image” can be run by anything that supports the Docker engine, as long as the syntax is valid.
Core concepts#
- Images: Read-only blueprints containing the application code, libraries, and dependencies.
- Containers: Runnable instances of an image. It is isolated from the host machine and other containers, operating with a thin read-write layer layered on top of the base image.
- Dockerfile: A text file with instructions on how to build a Docker image.
- Volumes: The preferred way to persist data. Since containers are ephemeral (data is lost when they are deleted), volumes store information on the host machine to keep it safe.
- Networks: These allow containers to communicate with each other or the outside world securely. The default driver is the bridge network.
- Docker Compose: A tool for defining and running multi-container applications using a single YAML file.
- Docker Engine: The Docker Engine is an API that runs on the host operating system, which communicates between the operating system and containers to access the system’s hardware
Core Commands#
docker pull <image_name>: Downloads an image from Docker Hub ↗.docker run -p <host_port>:<container_port> <image>: Creates and starts a container with port mapping.docker ps: Lists all currently running containers.docker stop <container_id>: Gracefully halts a running container.docker rm <container_id>: Deletes a stopped container.docker exec -it [containername] [command]: To run a command inside a docker container:docker build -t <name> .: Builds an image from a Dockerfile ↗.
Installation#
Refer the official docker engine installation guide: https://docs.docker.com/engine/install/ ↗
We can use the “convenience script” for one of the easiest ways to install it on your system. Once that’s done, any future updates will also be available through your package manager.
curl -fsSL https://get.docker.com | sudo shRegardless of how you install Docker on Ubuntu, the Docker systemd service will automatically start and enable. So, Docker will start automatically if the system is ever rebooted. You can check to see if it is running with the following command:
sudo systemctl status dockerIf Docker is not running, start it manually:
sudo systemctl start dockerVerify that the installation is successful by running the hello-world image:
sudo docker run hello-worldPost Install#
To manage Docker as a non-root user, you need add your user account to the docker group. This allows you to run Docker commands without using sudo them every time. However, it is important to note that adding a user to the docker group grants them significant privileges, as Docker allows direct access to the host system. Therefore, exercise caution when granting Docker access to non-root users, as it can potentially lead to security vulnerabilities if not properly managed and monitored.
sudo groupadd docker              # Create the docker group
sudo usermod -aG docker $USER     # Add your user to the group
newgrp docker                     # Activate the group changes without logging out
docker run hello-world # Verify permissions by running a container without sudo- You can use Docker Desktop ↗ to manage docker containers easily.
- Lazydocker ↗ is a TUI program to manage docker from the terminal.
Architecture#
Docker runs as a client-server architecture. It relies heavily on two Linux kernel features to isolate processes: Namespaces (which isolate what a process can see, like file systems, network interfaces, and process IDs) and Control Groups / cgroups (which limit what a process can use, such as CPU and memory limits).
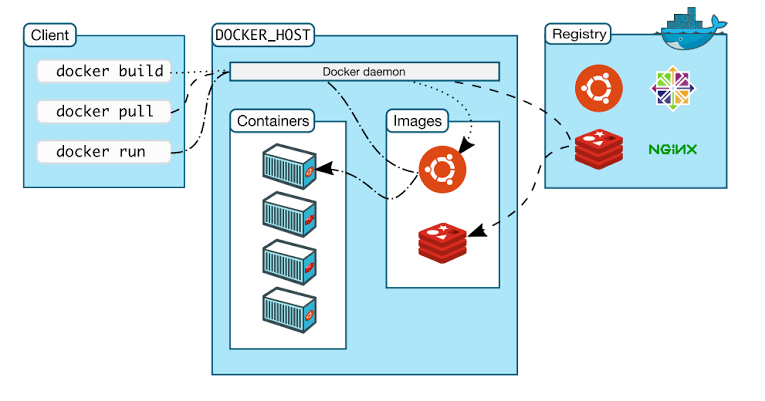
- Docker Daemon (
dockerd): The “brain” of the system. This background process manages all Docker objects, including images, containers, networks, and volumes. - Docker Client: The primary cli way you interact with Docker. When you type a command like
docker run, the client sends that request to the daemon via a REST API. - Docker Host: The physical or virtual machine where the Docker Engine actually runs. It contains the daemon, images, and running containers.
- Docker Registry: A centralized storage system for sharing images. Docker Hub is the default public registry, but organizations often use private ones like Amazon ECR or Google Artifact Registry.
Images & Containers#
The easiest analogy is object-oriented programming: an Image is the Class, and a Container is the Object (an instance of that class).
Docker images use a Union File System (UnionFS). Every line in a configuration file creates a new read-only layer.
┌───────────────────────────────────────┐
│     Container Writeable Layer         │  <-- Temporary read-write layer
├───────────────────────────────────────┤
│     Layer 3: Application Code         │  <-- Read-only
├───────────────────────────────────────┤
│     Layer 2: Environment Dependencies │  <-- Read-only
├───────────────────────────────────────┤
│     Layer 1: Base OS (e.g., Ubuntu)   │  <-- Read-only
└───────────────────────────────────────┘When a container starts, Docker adds a thin, writeable Container Layer on top. If the container modifies an existing file in a read-only layer, Docker uses the Copy-on-Write (CoW) strategy: it copies the file up to the writeable layer and modifies it there, leaving the underlying image pristine and reusable by other containers.
The Docker Lifecycle Blueprint#
To build and run applications, you follow a strict sequence from code definition to running execution environment.
1. Write the Dockerfile:
Create a text file named Dockerfile containing the instructions required to build your environment.
2. Build the Image:
Run docker build -t my-app .. This sends the context to the daemon, compiles the execution layers, and caches them locally.
3. Ship the Image (Optional)
Run docker push my-registry/my-app:1.0 to upload your read-only image layers to a centralized registry.
4. Instantiate the Container:
Run docker run -d -p 8080:80 my-app. The daemon pulls the image (if missing locally), unpacks the layers, creates the writeable layer, attaches namespaces/cgroups, and runs the application.
Persistent Storage: Data Management#
By default, data inside a container layer is ephemeral—it dies when the container is deleted. To persist data, Docker provides two principal technical mechanisms:
| Strategy | Host Mechanism | Best For |
|---|---|---|
| Volumes | Stored in a part of the host filesystem managed exclusively by Docker (/var/lib/docker/volumes/). | Database storage, shared data between multiple containers, decoupling data from host paths. |
| Bind Mounts | Maps any arbitrary directory/file on the host machine directly into the container. | Real-time source code sharing during local development (hot-reloading). |
Docker Networking Drivers#
Docker isolates container networking using specific network drivers depending on the communication architectural requirements:
- Bridge (Default): Creates a private virtual network inside the host machine. Containers connected to the same bridge can talk to each other via internal IP addresses or DNS names. You expose them to the outside world using port publishing (
-p host_port:container_port). - Host: Removes network isolation between the container and the Docker host. The container uses the host’s networking stack directly (offering higher performance but losing port isolation).
- Overlay: Enables containers running across different physical host machines to communicate securely with each other, widely utilized in multi-node clusters like Docker Swarm or Kubernetes.
- None: Completely disables all networking capabilities for the container.
Docker Commands#
To operate Docker effectively, you need a solid grasp of its command-line interface (CLI). The modern Docker CLI utilizes management commands (e.g., docker container run instead of the legacy shortcut docker run), which explicitly states the object type you are manipulating.
Container Management Commands#
These commands control the creation, state, and destruction of running isolated container processes.
docker container run [options] <image> [command] [arg](Short:docker run)- Purpose: Spawns a container instance from an image. This will create and start a container from a specified image.
- Common Optional flags:
--name my-app: Assigns a custom readable name to the container.-d: Detached mode (runs the container asynchronously in the background).-p [--publish] 8080:80: Port publishing (maps host port 8080 to container port 80).-v [--volume] /host/path:/container/path: Mounts a volume or bind mount.
[command]: An optional command to override the default executable specified inside the image’sCMDconfiguration.[arg...]: Optional arguments passed directly into the command.- Example:
docker run --name ubuntu --volume test:/mnt ubuntu- Run a container and immediately open an interactive terminal session inside it:
docker run -it ubuntu:24.04 /bin/bash - Run a web server or application continuously in the background:
docker run -d nginx
- Run a container and immediately open an interactive terminal session inside it:
docker container create <image>(Short:docker create <image>)- Purpose: Creates a container from an image.
docker container start <container id or name(Short:docker start)- Purpose: Starts an existing container.
docker container ls(Short:docker ps)- Purpose: Lists all currently running containers. Append the
-aflag (docker container ls -a) to show all containers, including stopped ones.
- Purpose: Lists all currently running containers. Append the
docker container stop <container_id_or_name>(Short:docker stop)- Purpose: Gracefully stops a running container by sending a
SIGTERMsignal, followed by aSIGKILLif it fails to shut down.
- Purpose: Gracefully stops a running container by sending a
docker container rm <container_id_or_name>(Short:docker rm)- Purpose: Permanently deletes a stopped container. To force-delete a container that is still actively running, add the
-fflag.
- Purpose: Permanently deletes a stopped container. To force-delete a container that is still actively running, add the
docker container exec <container_name> <command>- Purpose: Run a command inside a running container.
docker container exec -it <container_name> <shell_type>- Purpose: Spawns a new interactive process inside an already running container. The flags
-itbind your terminal’s interactive keyboard stream directly to the target container. - Example:
docker container exec -it my-db sh(Drops you into a shell inside themy-dbcontainer).
- Purpose: Spawns a new interactive process inside an already running container. The flags
Image Management Commands#
These commands manage your local read-only image layers and interface with remote registries.
docker image build -t <name>:<tag> <context_path>(Short:docker build)- Purpose: Compiles a Dockerfile into an image.
- Example:
docker image build -t my-api:1.0 .(Builds using the current directory.as context).
docker image ls(Short:docker images)- Purpose: Lists all Docker images currently stored locally on your host system.
docker image pull <image>:<tag>- Purpose: Explicitly downloads an image layer blueprint from a remote registry (like Docker Hub) without instantiating it.
docker image rm <image_id_or_name>(Short:docker rmi)- Purpose: Deletes a local image layer stack. You cannot delete an image if it is currently tied to a container (even a stopped one).
Network Management Commands#
These commands allow you to create, list, and destroy the virtual networks containers attach to.
docker network ls- Purpose: Lists all networks currently available on your Docker host machine. You will always see the default built-in networks:
bridge,host, andnone.
- Purpose: Lists all networks currently available on your Docker host machine. You will always see the default built-in networks:
docker network create --driver <type> <network_name>- Purpose: Creates a brand new software-defined network. Creating a custom
bridgenetwork is highly recommended for production because it automatically enables internal DNS resolution (containers can talk to each other by name rather than unstable IP addresses). - Example:
docker network create --driver bridge app-frontend-net
- Purpose: Creates a brand new software-defined network. Creating a custom
docker network rm <network_name>- Purpose: Deletes a specific custom network. Note that you cannot remove a network if containers are actively attached to it.
docker network prune- Purpose: Garbage collection for networks. It purges all custom networks that are not currently being used by at least one active container.
docker network inspect <network_name>- Purpose: Returns a detailed JSON array describing the configuration of the network, including its subnet allocation, gateway IP, and a list of every connected container alongside their internal IP addresses.
- Example:
docker network inspect bridge
Debugging & Inspection Commands#
When an application crashes or behaves unexpectedly, use these tools to diagnose the container’s internal state.
docker container logs -f --tail 100 <container_name>- Purpose: Streams the standard output (
stdout) and error (stderr) logs directly from inside the container.-ffollows the live output, and--tail 100limits it to the last 100 lines.
- Purpose: Streams the standard output (
docker container inspect <container_name>- Purpose: Returns low-level, extensive JSON metadata outlining the exact configuration state of the container (IP addresses, volume maps, port variables).
System Maintenance & Volume Commands#
Use these commands to manage persistent volumes and reclaim host disk storage space.
docker volume create <volume_name>- Purpose: Pre-provisions a named, dedicated storage directory on the host disk. Creating volumes explicitly allows you to isolate and name your datastores cleanly before attaching them to infrastructure.
- Example:
docker volume create production-db-data
docker volume ls- Purpose: Displays all persistent storage volumes managed exclusively by the Docker daemon.
docker volume rm <volume_name>- Purpose: Deletes a specific volume. This will fail if a container is still attached to the volume.
docker volume inspect <volume_name>- Purpose: Returns a structured JSON array detailing the volume’s metadata. The most critical field inside this output is the
Mountpoint, which indicates the exact absolute path on your host machine’s physical file system where the container’s data is being written in real-time.
- Purpose: Returns a structured JSON array detailing the volume’s metadata. The most critical field inside this output is the
docker system df- Purpose: Shows real-time disk allocation statistics—displaying exactly how much disk space is consumed by active images, containers, cache, and volumes.
docker system prune- Purpose: The utility cleanup command. Safely purges all stopped containers, dead networks, and dangling image layers. Add
-a --volumesto perform a deep, total hard disk wipe of unused components.
- Purpose: The utility cleanup command. Safely purges all stopped containers, dead networks, and dangling image layers. Add
Dockerfile#
A Dockerfile is a text document containing the sequential instructions a developer executes to assemble a Docker image. Think of it as a blueprint or a precise recipe: Docker reads these instructions from top to bottom, executing each one and committing the result as a new read-only layer.
Every directive in a Dockerfile creates an immutable filesystem layer. Docker utilizes Layer Caching to speed up subsequent builds. If a line and all lines preceding it haven’t changed, Docker skips executing that step and reuses the cached layer.
Pro-Tip: Always order your instructions from least frequently changed to most frequently changed. For example, copy dependency configurations (like
package.jsonorrequirements.txt) and install them before copying your actual application source code.
Dockerfile Directives Reference#
Here are the essential, standard instructions used to construct functional Dockerfiles:
1. Environment Setup & Basics#
FROM <image>[:tag]- Purpose: Defines the base image to start the build process. Every valid Dockerfile must start with
FROM(except in rare multi-stage builds). - Example:
FROM node:20-alpine(Uses a lightweight Alpine Linux distribution pre-packaged with Node.js).
- Purpose: Defines the base image to start the build process. Every valid Dockerfile must start with
WORKDIR /path/to/dir- Purpose: Sets the working directory for any subsequent
RUN,CMD,ENTRYPOINT,COPY, andADDinstructions. If the directory doesn’t exist, Docker creates it automatically. - Example:
WORKDIR /app
- Purpose: Sets the working directory for any subsequent
2. Filesystem Operations#
COPY <source> <destination>- Purpose: Copies local files or directories from the host machine’s build context into the filesystem of the container.
- Example:
COPY . .(Copies everything from the local folder to the container’s working directory).
ADD <source> <destination>- Purpose: Similar to
COPY, but with two extra capabilities: it can pull files from remote URLs, and it automatically extracts local tar archives into the destination. - Note: Use
COPYby default unless you explicitly need auto-extraction.
- Purpose: Similar to
3. Execution & Installation#
RUN <command>- Purpose: Executes commands during the build phase to install packages, compile code, or set up configurations. Each
RUNcreates a new image layer. - Example:
RUN npm installorRUN apt-get update && apt-get install -y curl
- Purpose: Executes commands during the build phase to install packages, compile code, or set up configurations. Each
ENV <key>=<value>- Purpose: Sets environment variables that persist inside the container both during the build phase and when running.
- Example:
ENV NODE_ENV=production
ARG <name>[=<default value>]- Purpose: Defines variables that users can pass to the docker builder at build-time using
--build-arg. UnlikeENV, these variables do not persist in the final running container.
- Purpose: Defines variables that users can pass to the docker builder at build-time using
4. Container Runtime Configs#
EXPOSE <port>- Purpose: Serves as documentation between the image creator and the person running the container, signaling which ports the containerized application listens on. It does not actually publish the port to the host machine (you still need
-pduringdocker run). - Example:
EXPOSE 8080
- Purpose: Serves as documentation between the image creator and the person running the container, signaling which ports the containerized application listens on. It does not actually publish the port to the host machine (you still need
VOLUME ["/data"]- Purpose: Creates a mount point with the specified name and marks it as holding externally mounted volumes from native host or other containers.
5. Initialization Instructions#
Understanding the difference between CMD and ENTRYPOINT is crucial. They dictate what process runs when the container spawns.
ENTRYPOINT ["executable", "param1"]- Purpose: Sets the primary executable command for the container. It configures the container to run as if it were a binary executable itself. It is difficult to override at runtime.
CMD ["param1", "param2"]- Purpose: Provides default arguments for the
ENTRYPOINT. If noENTRYPOINTis defined,CMDacts as the primary executable command. Crucially,CMDis completely overridden if the user appends a command todocker run.
- Purpose: Provides default arguments for the
Anatomy of a Real-World Dockerfile#
Here is how these options string together logically for a web application using best practices:
# 1. Start with a secure, small base image
FROM node:20-alpine

# 2. Set an environment variable
ENV PORT=3000

# 3. Create and isolate the application directory
WORKDIR /usr/src/app

# 4. Copy dependency files first to exploit layer caching
COPY package*.json ./

# 5. Run installation during the build phase
RUN npm ci --only=production

# 6. Copy the rest of the application source code
COPY . .

# 7. Document the network port target
EXPOSE 3000

# 8. Define the execution boundary
CMD ["node", "server.js"]Docker Compose#
Applications rarely run in isolation; you usually need a web server, a database, and a cache working together. Docker Compose is a tool for defining and running multi-container applications using a declarative YAML configuration file (docker-compose.yml).
Important commands#
docker compose up -d: Reads the configuration file, downloads/builds components, and starts all containers running asynchronously in the background (-dfor detached mode).docker compose down: Stops running containers, cleans up networking resources, and safely detaches infrastructure created byup(leaves your volume data safe).docker compose logs -f: Aggregates and streams real-time terminal output logs from all running containers in the stack simultaneously.docker compose exec <service_name> <command>: Drops you directly into an interactive terminal session inside a running container instance. (e.g.,docker compose exec database psql -U postgres).
Structure of docker-compose.yml#
The configuration is organized into four primary, high-level top-level structural blocks:
# Top-level block 1: The engine/spec version (Optional in modern Compose V2)
version: "3.8"

# Top-level block 2: The container declarations
services:
  web-app:
    # Service configurations go here...

# Top-level block 3: Shared network definitions
networks:
  backend-net:

# Top-level block 4: Persistent storage volumes
volumes:
db-data:Inside the services block, each named item represents a container wrapper. Here are the core directives used to configure individual services:
1. Image Provisioning#
image: Specifies the pre-built image to pull from a registry (like Docker Hub).- Example:
image: postgres:15-alpine
- Example:
build: Instructs Compose to build an image from a local directory containing aDockerfileinstead of pulling an existing one.- Example:
yamlbuild: context: ./backend dockerfile: Dockerfile.dev
- Example:
2. Infrastructure & Communication#
ports: Maps a port on the host machine to a port inside the container (HOST:CONTAINER). This exposes the service to the outside world.- Example:
yamlports: - "8080:3000" # Host port 8080 routes to container port 3000
- Example:
networks: Attaches the container to specific virtual networks. Containers sitting on the same network can discover and talk to each other using their service names as hostnames (e.g., the backend app can connect to a database using the stringhost=database).volumes: Mounts persistent storage volumes or host paths into the container (HOST_OR_VOLUME:CONTAINER_PATH).- Example:
yamlvolumes: - db-data:/var/lib/postgresql/data # Named volume for persistence - ./src:/app/src # Bind mount for live code changes
- Example:
3. Execution Control & State#
environment: Defines environment variables passed inside the container at runtime.- Example:
Docker Compose automatically reads a file named
yamlenvironment: - NODE_ENV=production - DB_PASSWORD=${DB_PASSWORD} # env variables can be pulled from .env files in the same directory. env_file: - .env # Injects all variables from .env directly into the container.envif it is placed in the exact same directory as yourdocker-compose.ymlfile.
If your environment file is not named exactly.env(for example,.env.devor.env.prod), Docker Compose will not read it automatically. You must explicitly point to it using the CLI :docker compose --env-file .env.dev up -d
- Example:
depends_on: Expresses startup and shutdown dependencies between services. It ensures that infrastructure prerequisites (like a database) boot up before application servers depend on them.restart: Configures the container’s restart policy in case of unexpected crashes or host reboots. Common values includeno,always,on-failure, andunless-stopped.
Real-World Production Example#
An example which configures a Node.js web application linked to a secure PostgreSQL database instance:
version: "3.8"

services:
  # Service 1: The Application Server
  web:
    build:
      context: .
      dockerfile: Dockerfile
    ports:
      - "80:3000"
    environment:
      - DB_HOST=database
      - DB_USER=postgres
      - DB_PASSWORD=supersecurepwd
    depends_on:
      database:
        condition: service_healthy # Wait for the DB health check to pass
    networks:
      - app-network

  # Service 2: The Database Infrastructure
  database:
    image: postgres:15-alpine
    environment:
      - POSTGRES_USER=postgres
      - POSTGRES_PASSWORD=supersecurepwd
      - POSTGRES_DB=app_production
    volumes:
      - db-data:/var/lib/postgresql/data
    networks:
      - app-network
    healthcheck:
      test: ["CMD-SHELL", "pg_isready -U postgres"]
      interval: 5s
      timeout: 5s
      retries: 5

# Shared infrastructure declared globally
volumes:
  db-data: # Allocates managed, persistent storage on the host disk

networks:
app-network: # Creates an isolated virtual bridge networkAdvanced Docker#
1. Optimization: Multi-Stage Builds#
When you build a standard Dockerfile, every tool you use to compile your code (compilers, test runners, package managers) ends up inside the final image. This results in bloated images that are slow to ship and present a larger security attack surface.
Multi-Stage Builds solve this by using multiple FROM statements in a single Dockerfile. You pull in heavy build tools in an intermediate stage, compile your binary or asset bundle, and then copy only the final compiled artifacts into a fresh, bare-minimum production stage.
# Stage 1: The Build Environment
FROM node:20-alpine AS builder
WORKDIR /app
COPY package*.json ./
RUN npm ci
COPY . .
RUN npm run build  # Creates a small /dist folder

# Stage 2: The Production Runtime
FROM alpine:3.20
RUN apk add --no-cache nodejs npm
WORKDIR /app
# Copy ONLY the compiled artifacts from the builder stage
COPY --from=builder /app/dist ./dist
COPY --from=builder /app/package*.json ./
RUN npm ci --only=production

CMD ["node", "dist/server.js"]- The Result: Your final image size can easily drop from 1 GB down to 50 MB because the source code, development dependencies, and caching debris are completely left behind.
Docker Secrets#
Standard environment variables are visible to anyone running docker inspect. For high-security environments, Docker provides Docker Secrets.
Instead of passing passwords through environment strings, Docker mounts the secrets as actual secure files inside an in-memory file system (/run/secrets/) inside the container. They are never written to disk or exposed in configuration logs.
version: "3.8"

services:
  db:
    image: postgres:15-alpine
    environment:
      # Tell Postgres to look for the password inside a file
      POSTGRES_PASSWORD_FILE: /run/secrets/db_password
    secrets:
      - db_password

secrets:
  db_password:
file: ./prod_db_password.txt # File on host system, not committed to gitImage Pruning & Resource Garbage Collection#
Docker aggressively caches layers, stopped containers, and unused volumes. Over time, this eats up massive amounts of disk space on your host machine. Understanding garbage collection is essential for maintenance:
- Dangling Images: Images that no longer have a relationship to any tagged image (often showing up as
<none>:<none>when you rundocker images). They occur when you rebuild an image with the same tag. - The Cleanup Kit:
docker system prune: Deletes all stopped containers, unused networks, and dangling images.docker system prune -a --volumes: The nuclear option. Clears absolute everything that isn’t explicitly tied to a currently running container, freeing up gigabytes of host storage.
Container Orchestration: Swarm vs. Kubernetes#
What happens when your application grows so large that it can no longer fit on a single physical host machine? You need an orchestrator to manage clusters of machines running Docker.
| Orchestrator | Complexity | Best For | Description |
|---|---|---|---|
| Docker Swarm | Low | Small-to-medium business stacks | Built natively into the Docker engine. Uses standard Compose files to deploy containers across a cluster of machines out-of-the-box. |
| Kubernetes (K8s) | High | Enterprise scale, high-availability | The industry standard. Treats Docker purely as a container runtime engine. Handles automated scaling, self-healing, complex load balancing, and mesh networking across thousands of machines. |
Non-Root Containers (Security Hardening)#
By default, Docker runs the processes inside a container as the root user. If an attacker manages to exploit a vulnerability in your application code and escape the container boundaries, they instantly inherit root privileges on your physical host machine.
Production-grade Dockerfiles explicitly change the execution user context before launching the app:
FROM node:20-alpine
WORKDIR /app
COPY . .
# Alpine Node image comes pre-configured with a limited 'node' user
USER node
CMD ["node", "index.js"]Security Testing#
The Docker documentation mentions that by default, there is a setting called “Enhanced Container Isolation” which blocks containers from mounting the Docker socket to prevent malicious access to the Docker Engine. In some cases, like when running test containers, they need Docker socket access. The socket provides a means to access containers via the API directly.
Try ls -la /var/run/docker.sock. If we can see it, it means we can run access the docker socket from inside the docker container.
By running docker ps again, we can confirm we can perform Docker commands and interact with the API; in other words, we can perform a Docker Escape attack!